30/11/13

Autodesk 2014 Building Design Suite Ultimate Uninstaller

The Autodesk suite is not the easiest to uninstall because of all the components that the built in uninstaller does not uninstall. I went in and extracted all of the GUIDs for each components and created the powershell script below to uninstall the entire suite. The firm I work for splits up the BDS Ultimate suite into two different disciplines, Architecture and Engineering. I have only tested this on both of these, which neither includes the entire BDS Ultimate.

 #*******************************************************************************  
 #   Author: Mick Pletcher  
 #    Date: 30 November 2013  
 #  
 #   Program: Autodesk BDS Ultimate Uninstaller  
 #*******************************************************************************  

 Function UninstallApplication($Application,$GUID) {  

      #Declare Local Variables  
      Set-Variable -Name Code -Scope Local -Force  
      Set-Variable -Name Arguments -Scope Local -Force  

      Write-Host $Application"...." -NoNewline  
      $Arguments = "/x "+$GUID+" /qb- /norestart"  
      $Code = (Start-Process -FilePath msiexec.exe -ArgumentList $Arguments -Wait -Passthru).ExitCode  
      If ($Code -eq 0) {  
           Write-Host "Uninstalled" -ForegroundColor Yellow  
      } elseIf ($Code -eq 1605) {  
           Write-Host "Not Installed" -ForegroundColor Yellow  
      } else {  
           Write-Host "Failed with error code"$Code -ForegroundColor Red  
      }  

      #Cleanup Local Variables  
      Remove-Variable -Name Code -Scope Local -Force  
      Remove-Variable -Name Arguments -Scope Local -Force  

 }
  
 UninstallApplication "Microsoft Visual C++ 2008 SP1 Redistributable (x64)" "{5FCE6D76-F5DC-37AB-B2B8-22AB8CEDB1D4}"  
 UninstallApplication "Microsoft Visual C++ 2008 SP1 Redistributable (x64)" "{5FCE6D76-F5DC-37AB-B2B8-22AB8CEDB1D4}"  
 UninstallApplication "Microsoft Visual C++ 2008 SP1 Redistributable (x86)" "{9BE518E6-ECC6-35A9-88E4-87755C07200F}"  
 UninstallApplication "Microsoft Visual C++ 2008 SP1 Redistributable (x86)" "{9BE518E6-ECC6-35A9-88E4-87755C07200F}"  
 UninstallApplication "Microsoft Visual C++ 2010 SP1 Redistributable (x86)" "{F0C3E5D1-1ADE-321E-8167-68EF0DE699A5}"  
 UninstallApplication "Microsoft Visual C++ 2010 SP1 Redistributable (x64)" "{1D8E6291-B0D5-35EC-8441-6616F567A0F7}"  
 UninstallApplication "Microsoft Visual C++ 2008 x86 ATL Runtime" "{04B34E21-5BEE-3D2B-8D3D-E3E80D253F64}"  
 UninstallApplication "Microsoft Visual C++ 2008 x86 MFC Runtime" "{B42E259C-E4D4-37F1-A1B2-EB9C4FC5A04D}"  
 UninstallApplication "Microsoft Visual C++ 2008 x86 CRT Runtime" "{14866AAD-1F23-39AC-A62B-7091ED1ADE64}"  
 UninstallApplication "Microsoft Visual C++ 2008 x86 OpenMP Runtime" "{4B90093A-5D9C-3956-8ABB-95848BE6EFAD}"  
 UninstallApplication "Microsoft Visual C++ 2008 x64 ATL Runtime" "{C3A57BB3-9AA6-3F6F-9395-6C062BDD5FC4}"  
 UninstallApplication "Microsoft Visual C++ 2008 x64 MFC Runtime" "{6DA2B636-698A-3294-BF4A-B5E11B238CDD}"  
 UninstallApplication "Microsoft Visual C++ 2008 x64 CRT Runtime" "{F6F09DD8-F39B-3A16-ADB9-C9E6B56903F9}"  
 UninstallApplication "Microsoft Visual C++ 2008 x64 OpenMP Runtime" "{8CCEA24C-51AE-3B71-9092-7D0C44DDA2DF}"  
 UninstallApplication "FARO LS" "{8A470330-70B2-49AD-86AF-79885EF9898A}"  
 UninstallApplication "Revit 2014" "{7346B4A0-1400-0510-0000-705C0D862004}"  
 UninstallApplication "Autodesk Workflows 2014" "{11672AB2-3D48-4D38-9123-719E5FF93333}"  
 UninstallApplication "MSXML 6.0 Parser" "{FF59CB23-1800-4047-B40C-E20AE7051491}"  
 UninstallApplication "Revit 2014 Language Pack - English" "{7346B4A0-1400-0511-0409-705C0D862004}"  
 UninstallApplication "Autodesk Material Library 2014" "{644F9B19-A462-499C-BF4D-300ABC2A28B1}"  
 UninstallApplication "Autodesk Material Library Base Resolution Image Library 2014" "{51BF3210-B825-4092-8E0D-66D689916E02}"  
 UninstallApplication "Autodesk Material Library Low Resolution Image Library 2014" "{5C29CC1F-218F-4C30-948A-11066CAC59FB}"  
 UninstallApplication "Autodesk Content Service" "{62F029AB-85F2-0000-866A-9FC0DD99DDBC}"  
 UninstallApplication "Autodesk Content Service Language Pack" "{62F029AB-85F2-0001-866A-9FC0DD99DDBC}"  
 UninstallApplication "AutoCAD 2014 - English" "{5783F2D7-D001-0000-0102-0060B0CE6BBA}"  
 UninstallApplication "AutoCAD 2014 Language Pack - English" "{5783F2D7-D001-0409-1102-0060B0CE6BBA}"  
 UninstallApplication "AutoCAD 2014 - English" "{5783F2D7-D001-0409-2102-0060B0CE6BBA}"  
 UninstallApplication "Autodesk 360" "{52B28CAD-F49D-47BA-9FFE-29C2E85F0D0B}"  
 UninstallApplication "SketchUp Import for AutoCAD 2014" "{644E9589-F73A-49A4-AC61-A953B9DE5669}"  
 UninstallApplication "Autodesk Navisworks 2014 64 bit Exporter Plug-ins" "{914E5049-303D-5993-9734-CF12636383B4}"  
 UninstallApplication "Autodesk Navisworks 2014 64 bit Exporter Plug-ins English Language Pack" "{914E5049-303D-0409-9734-CF12636383B4}"  
 UninstallApplication "Autodesk Material Library Medium Resolution Image Library 2014" "{A0633D4E-5AF2-4E3E-A70A-FE9C2BD8A958}"  
 UninstallApplication "Autodesk Revit Interoperability for 3ds Max 2014" "{0BB716E0-1400-0410-0000-097DC2F354DF}"  
 UninstallApplication "Autodesk 3ds Max Design 2014" "{52B37EC7-D836-0409-0164-3C24BCED2010}"  
 UninstallApplication "Autodesk 3ds Max Design 2014 64-bit Populate Data" "{2BCAFE22-BE25-4437-815C-54596D630397}"  
 UninstallApplication "Autodesk DirectConnect 2014 64-bit" "{8FC7C2B2-0F64-4B35-AA3D-2B051D009243}"  
 UninstallApplication "Autodesk Inventor Server Engine for 3ds Max Design 2014 64-bit" "{CBC74B06-FE35-482C-89D6-CE95A0289C06}"  
 UninstallApplication "Autodesk Composite 2014" "{5AAB972C-FF31-4B01-8445-50C42860EC02}"  
 UninstallApplication "Autodesk® Backburner 2014" "{3D347E6D-5A03-4342-B5BA-6A771885F379}"  
 UninstallApplication "Autodesk Essential Skills Movies for 3ds Max Design 2014 64-bit" "{280881E4-0E3C-40E6-9B76-E05A865551BB}"  
 UninstallApplication "Autodesk Sketchbook Designer 2014" "{4057E6CF-C9AC-45D7-87D4-A8FAE305AAC1}"  
 UninstallApplication "Autodesk SketchBook Designer for AutoCAD 2014" "{8BFDC12D-7F32-4F77-95DE-D1A42BAC91DD}"  
 UninstallApplication "Autodesk Showcase 2014 64-bit" "{42FCE681-2220-4EAA-8E39-20B527585547}"  
 UninstallApplication "Autodesk Revit Interoperability for 3ds Max 2014" "{0BB716E0-1400-0610-0000-097DC2F354DF}"  
 UninstallApplication "AutoCAD Architecture 2014 - English" "{5783F2D7-D004-0000-0102-0060B0CE6BBA}"  

28/11/13

Powershell: Disable Windows Media Center

If you are needing to disable Windows Media Center in Windows 7 by command line, here is a script that will do just that. This script will not only disable it, but it will also add an add/remove programs and HKCR entry so that both WMI and SCCM can detect the service was disabled.


 #*******************************************************************************  
# Author: Mick Pletcher
# Date: 16 August 2013
#
# Program: Windows Media Center
#*******************************************************************************
cls

#Declare Global Memory
Set-Variable -Name a -Scope Global -Force
Set-Variable -Name Output -Scope Global -Force

Function AddRemovePrograms($KeyName, $DisplayName, $Version){

#Define Local Memory
New-PSDrive -Name HKCR -PSProvider Registry -Root HKEY_CLASSES_ROOT
Set-Variable -Name AddRemKey -Scope Local -Force
Set-Variable -Name guid -Scope Local -Force
Set-Variable -Name ProductsKey -Scope Local -Force

If (!(Test-Path c:\windows\GSPBox_Icon.bmp)){
Copy-Item -Path \\global.gsp\data\clients\na_clients\Build\Add-ins\GSPBox_Icon.bmp -Destination c:\Windows -Force
}
$AddRemKey = "HKLM:\SOFTWARE\Wow6432Node\Microsoft\Windows\CurrentVersion\Uninstall"
$ProductsKey = "HKCR:\Installer\Products\"
New-Item -Path $AddRemKey -Name $KeyName –Force
New-ItemProperty -Path $AddRemKey"\"$KeyName -Name DisplayName -Value $DisplayName -PropertyType String
New-ItemProperty -Path $AddRemKey"\"$KeyName -Name DisplayVersion -Value $Version -PropertyType String
New-ItemProperty -Path $AddRemKey"\"$KeyName -Name UninstallString -Value " " -PropertyType String
New-ItemProperty -Path $AddRemKey"\"$KeyName -Name Publisher -Value "Gresham, Smith and Partners" -PropertyType String
New-ItemProperty -Path $AddRemKey"\"$KeyName -Name DisplayIcon -Value "c:\windows\GSPBox_Icon.bmp" -PropertyType String
$guid = [guid]::NewGuid().ToString("N")
$guid.ToString()
$guid = $guid.ToUpper()
New-Item -Path $ProductsKey -Name $guid –Force
New-ItemProperty -Path $ProductsKey"\"$guid -Name ProductName -Value $DisplayName -PropertyType String -Force

#Cleanup Local Memory
remove-psdrive -name HKCR
Remove-Variable -Name AddRemKey -Scope Local -Force
Remove-Variable -Name guid -Scope Local -Force
Remove-Variable -Name ProductsKey -Scope Local -Force

}

Invoke-Command {dism.exe /online /disable-feature /featurename:MediaCenter /norestart}
$a = Invoke-Command {dism.exe /online /get-featureinfo /featurename:MediaCenter}
$Output = $a | Select-String "State : Disabled"
Write-Host $Output
If ($Output -like "State : Disabled"){
AddRemovePrograms "MediaCenter" "MediaCenter" "Disabled"
}

#Cleanup Global Memory
Remove-Variable -Name a -Scope Global -Force
Remove-Variable -Name Output -Scope Global -Force

26/11/13

Powershell: Add/Remove Program entries

Sometimes it is necessary to add an add/remove programs entry. There are instances where an application is independent and requires not installation and you want to make sure it is copied to the system, or you use add/remove programs to verify a service is enabled/disabled. For whatever reason you need to add an entry you want to also add the registry keys so that a WMI query will also detect the entry. The script below will do just that. It creates a GUID, which is required to write the entry in the HKCR key. This is where the WMI will read from, not from the Uninstall directory.


 Function AddRemovePrograms($KeyName, $DisplayName, $Version){  

#Define Local Memory
New-PSDrive -Name HKCR -PSProvider Registry -Root HKEY_CLASSES_ROOT
Set-Variable -Name AddRemKey -Scope Local -Force
Set-Variable -Name guid -Scope Local -Force
Set-Variable -Name ProductsKey -Scope Local -Force

If (!(Test-Path c:\windows\GSPBox_Icon.bmp)){
Copy-Item -Path \\global.gsp\data\clients\na_clients\Build\Add-ins\GSPBox_Icon.bmp -Destination c:\Windows -Force
}
$AddRemKey = "HKLM:\SOFTWARE\Wow6432Node\Microsoft\Windows\CurrentVersion\Uninstall"
$ProductsKey = "HKCR:\Installer\Products\"
New-Item -Path $AddRemKey -Name $KeyName –Force
New-ItemProperty -Path $AddRemKey"\"$KeyName -Name DisplayName -Value $DisplayName -PropertyType String
New-ItemProperty -Path $AddRemKey"\"$KeyName -Name DisplayVersion -Value $Version -PropertyType String
New-ItemProperty -Path $AddRemKey"\"$KeyName -Name UninstallString -Value " " -PropertyType String
New-ItemProperty -Path $AddRemKey"\"$KeyName -Name Publisher -Value "Gresham, Smith and Partners" -PropertyType String
New-ItemProperty -Path $AddRemKey"\"$KeyName -Name DisplayIcon -Value "c:\windows\GSPBox_Icon.bmp" -PropertyType String
$guid = [guid]::NewGuid().ToString("N")
$guid.ToString()
$guid = $guid.ToUpper()
New-Item -Path $ProductsKey -Name $guid –Force
New-ItemProperty -Path $ProductsKey"\"$guid -Name ProductName -Value $DisplayName -PropertyType String -Force

#Cleanup Local Memory
remove-psdrive -name HKCR
Remove-Variable -Name AddRemKey -Scope Local -Force
Remove-Variable -Name guid -Scope Local -Force
Remove-Variable -Name ProductsKey -Scope Local -Force
}

SCCM: Verify applications were installed during build process

As many of you have probably experienced, SCCM and MDT do not always install all of the applications that are in the task sequence list, even if it returned an error code 0. This can be rather annoying, especially when it happens in the build process of the golden image. In order to get around this issue, I wrote the PowerShell script below that will use WMI to verify all of the applications were installed during the task sequence process. All that you should have to do to make custom changes for your environment is to open up the script and add your apps. You will see four examples I put in this script, AppInstalled "Adobe Reader"  being one example. The Adobe Reader in parenthesis can be changed to any app, such as Microsoft Office. You do not need to enter the entire application name, as I have written the function to be able to search for just part of the name. I used the Adobe Reader example because your company may have more than one version of reader and this can search any version being just a portion of the name.

In order to properly implement this, I would suggest putting this as a task sequence and then immediately pausing the build so that you can review the output of this and manually install any applications that may have failed before the golden image is generated. To pause the build for MDT, you can initiate the LTISuspend.wsf as a task sequence. SCCM does not have this wsf file, so you can create a simple, one line VBS file that calls the MSGBOX which will wait for you to click OK on. The VBS can also be used in MDT instead of the LTISuspend.wsf.

You can download this script here.

 #*******************************************************************************  
 #   Author: Mick Pletcher  
 #    Date: 25 November 2013  
 #  
 #   Program: Check Build  
 #*******************************************************************************  
 Clear-Host  

 #Declare Global Memory  
 $app = ,@()  
 Set-Variable -Name Count -Scope Global -Value 1 -Force  
 Set-Variable -Name OS -Scope Global -Force  
 Set-Variable -Name RelativePath -Scope Global -Force  

 Function RenameWindow ($Title) {  

      #Declare Local Memory  
      Set-Variable -Name a -Scope Local -Force
  
      $a = (Get-Host).UI.RawUI  
      $a.WindowTitle = $Title  

      #Cleanup Local Memory  
      Remove-Variable -Name a -Scope Local -Force
  
 }  

 Function AppInstalled($Description) {
  
      #Declare Local Memory  
      Set-Variable -Name AppName -Scope Local -Force  
      Set-Variable -Name AppLocal -Scope Local -Force  
      Set-Variable -Name Desc -Scope Local -Force  
      Set-Variable -Name Output -Scope Local -Force
  
      $object = New-Object -TypeName PSObject  
      #Change '%application%' to whatever app you are calling  
      $Desc = [char]34+"description like"+[char]32+[char]39+[char]37+$Description+[char]37+[char]39+[char]34  
      $Output = wmic product where $Desc get Description  
      $Output | ForEach-Object {  
           $_ = $_.Trim()  
             if(($_ -ne "Description")-and($_ -ne "")){  
                $AppName = $_  
             }  
      }  
      $AppLocal = New-Object System.Object  
      $AppLocal | Add-Member -type NoteProperty -name Application -value $Description  
      If ($AppName -ne $null) {  
           #$Global:app+=,@($Description,"Installed")  
           $AppLocal | Add-Member -type NoteProperty -name Status -value "Installed"  
      } else {  
           #$Global:app+=,@($Description,"Not Installed")  
           $AppLocal | Add-Member -type NoteProperty -name Status -value "Not Installed"  
      }  
      $Global:app += $AppLocal  
      $AppLocal | Select Application  
      $Global:Count++  

      #Cleanup Local Memory  
      Remove-Variable -Name AppName -Scope Local -Force  
      Remove-Variable -Name AppLocal -Scope Local -Force  
      Remove-Variable -Name Desc -Scope Local -Force  
      Remove-Variable -Name Output -Scope Local -Force
  
 }  

 cls  
 Write-Host "Processing Applications"  
 Write-Host  
 RenameWindow "Check Build Installs"  
 AppInstalled "Dell Client System Update"  
 AppInstalled "Adobe Reader"  
 AppInstalled "Microsoft Lync"  
 cls  
 Write-Host "Installation Report"  
 Write-Host  
 $app | Format-Table
  
 #Cleanup Global Memory  
 $app.Clear()  
 Remove-Variable -Name Count -Scope Global -Force  
 Remove-Variable -Name OS -Scope Global -Force  
 Remove-Variable -Name RelativePath -Scope Global -Force  

Powershell: Dell Client System Update for the SCCM & MDT Build

The DCSU is a great utility that Dell has made available to update the drivers and driver applications on Dell systems. The industry I work in requires specific drivers for specific applications, which makes the DCSU not a great utility for us after the system is built. However, the utility is great for making sure all of the drivers are installed during the build process. I have written the script below that will install the DCSU, run it with a specific policy XML file you create, and then comes back and uninstalls it.

NOTE: If you are having Bitlocker enabled during your build, make sure this is executed before bitlocker is enabled, or add a function that will pause Bitlocker.


 #*******************************************************************************  
# Author: Mick Pletcher
# Date: 25 November 2013
#
# Program: Dell Client System Update
#*******************************************************************************
Clear-Host
#Declare Global Memory
Set-Variable -Name OS -Scope Global -Force
Set-Variable -Name RelativePath -Scope Global -Force
Function RenameWindow ($Title) {
#Declare Local Memory
Set-Variable -Name a -Scope Local -Force
$a = (Get-Host).UI.RawUI
$a.WindowTitle = $Title
#Cleanup Local Memory
Remove-Variable -Name a -Scope Local -Force
}
Function GetRelativePath {
$Global:RelativePath=(split-path $SCRIPT:MyInvocation.MyCommand.Path -parent)+"\"
}
Function GetOSArchitecture {
$Global:Architecture = Get-WMIObject win32_operatingsystem
$Global:Architecture = $Global:Architecture.OSArchitecture
#Answers: 32-bit, 64-bit
}
Function ProcessRunning($Description,$Process) {
#Declare Local Memory
Set-Variable -Name ProcessActive -Scope Local -Force
Write-Host $Description"....." -NoNewline
$ProcessActive = Get-Process $Process -ErrorAction SilentlyContinue
if($ProcessActive -eq $null) {
Write-Host "Not Running" -ForegroundColor Yellow
} else {
Write-Host "Running" -ForegroundColor Red
}
#Cleanup Local Memory
Remove-Variable -Name ProcessActive -Scope Local -Force
}
Function KillProcess($Description,$Process) {
#Declare Local Memory
Set-Variable -Name ProcessActive -Scope Local -Force
Write-Host $Description"....." -NoNewline
$ProcessActive = Stop-Process -Name $Process -Force
If ($ProcessActive -eq $null) {
Write-Host "Killed" -ForegroundColor Yellow
} else {
Write-Host "Still Running" -ForegroundColor Red
}
}
Function CopyFile($FileName,$SourceDir,$DestinationDir,$NewFileName) {
If ($SourceDir.SubString($SourceDir.length-1) -ne "\") {
$SourceDir = $SourceDir+"\"
}
If ((Test-Path -Path $SourceDir$FileName) -eq $true) {
Write-Host "Copying"$FileName"....."
Copy-Item -Path $SourceDir$FileName -Destination $DestinationDir -Force
If ($NewFileName -ne "") {
If ($DestinationDir.SubString($DestinationDir.length-1) -ne "\") {
$DestinationDir = $DestinationDir+"\"
}
Rename-Item -Path $DestinationDir$FileName -NewName $NewFileName -Force
}
}
}
Function BalloonTip($ApplicationName, $Status, $DisplayTime) {
#Declare Local Memory
Set-Variable -Name balloon -Scope Local -Force
Set-Variable -Name icon -Scope Local -Force
Set-Variable -Name path -Scope Local -Force
[system.Reflection.Assembly]::LoadWithPartialName('System.Windows.Forms') | Out-Null
$balloon = New-Object System.Windows.Forms.NotifyIcon
$path = Get-Process -id $pid | Select-Object -ExpandProperty Path
$icon = [System.Drawing.Icon]::ExtractAssociatedIcon($path)
$balloon.Icon = $icon
$balloon.BalloonTipIcon = 'Info'
$balloon.BalloonTipTitle = "Gresham, Smith and Partners"
$balloon.BalloonTipText = $ApplicationName+[char]13+[char]13+$Status
$balloon.Visible = $true
$balloon.ShowBalloonTip($DisplayTime)
#Cleanup Local Memory
Remove-Variable -Name balloon -Scope Local -Force
Remove-Variable -Name icon -Scope Local -Force
Remove-Variable -Name path -Scope Local -Force
}
Function UninstallOldMSIApplication($Description) {
#Declare Local Memory
Set-Variable -Name AppName -Scope Local -Force
Set-Variable -Name Arguments -Scope Local -Force
Set-Variable -Name Desc -Scope Local -Force
Set-Variable -Name ErrCode -Scope Local -Force
Set-Variable -Name GUID -Scope Local -Force
Set-Variable -Name Output -Scope Local -Force
Set-Variable -Name Output1 -Scope Local -Force
#Change '%application%' to whatever app you are calling
$Desc = [char]34+"description like"+[char]32+[char]39+[char]37+$Description+[char]37+[char]39+[char]34
$Output1 = wmic product where $Desc get Description
cls
$Output1 | ForEach-Object {
$_ = $_.Trim()
if(($_ -ne "Description")-and($_ -ne "")){
$AppName = $_
}
}
If ($AppName -eq $null) {
return
}
Write-Host "Uninstalling"$AppName"....." -NoNewline
$Output = wmic product where $Desc get IdentifyingNumber
$Output | ForEach-Object {
$_ = $_.Trim()
if(($_ -ne "IdentifyingNumber")-and($_ -ne "")){
$GUID = $_
}
}
$Arguments = "/X"+[char]32+$GUID+[char]32+"/qb- /norestart"
$ErrCode = (Start-Process -FilePath "msiexec.exe" -ArgumentList $Arguments -Wait -Passthru).ExitCode
$Result = (AppInstalled $Description)
If ($Result) {
Write-Host "Failed with error code"$ErrCode -ForegroundColor Red
} else {
Write-Host "Uninstalled" -ForegroundColor Yellow
}
#Cleanup Local Memory
Remove-Variable -Name AppName -Scope Local -Force
Remove-Variable -Name Arguments -Scope Local -Force
Remove-Variable -Name Desc -Scope Local -Force
Remove-Variable -Name ErrCode -Scope Local -Force
Remove-Variable -Name GUID -Scope Local -Force
Remove-Variable -Name Output -Scope Local -Force
Remove-Variable -Name Output1 -Scope Local -Force
}
Function InstallMSIApplication($App,$Switches,$Transforms,$Desc) {
#Declare Local Memory
Set-Variable -Name App -Scope Local -Force
Set-Variable -Name Arguments -Scope Local -Force
Set-Variable -Name ErrCode -Scope Local -Force
Set-Variable -Name Result -Scope Local -Force
Write-Host "Installing"$Desc"....." -NoNewline
$App = [char]32+[char]34+$RelativePath+$App+[char]34
$Switches = [char]32+$Switches
If ($Transforms -ne $null) {
$Transforms = [char]32+"TRANSFORMS="+$RelativePath+$Transforms
$Arguments = "/I"+$App+$Transforms+$Switches
} else {
$Arguments = "/I"+$App+$Switches
}
$ErrCode = (Start-Process -FilePath "msiexec.exe" -ArgumentList $Arguments -Wait -Passthru).ExitCode
$Result = (AppInstalled $Desc)
If ($Result) {
Write-Host "Installed" -ForegroundColor Yellow
} else {
Write-Host "Failed with error"$ErrCode -ForegroundColor Red
}
#Cleanup Local Memory
Remove-Variable -Name App -Scope Local -Force
Remove-Variable -Name Arguments -Scope Local -Force
Remove-Variable -Name ErrCode -Scope Local -Force
Remove-Variable -Name Result -Scope Local -Force
}
Function InstallEXEApplication($App,$Switches,$Desc) {
#Declare Local Memory
Set-Variable -Name ErrCode -Scope Local -Force
Set-Variable -Name Result -Scope Local -Force
Write-Host "Installing <Application>....." -NoNewline
$App = [char]32+[char]34+$RelativePath+$App+[char]34
$ErrCode = (Start-Process -FilePath $App -ArgumentList $Switches -Wait -Passthru).ExitCode
$Result = (AppInstalled $Desc)
If ($Result) {
Write-Host "Installed" -ForegroundColor Yellow
} else {
Write-Host "Failed with error"$ErrCode -ForegroundColor Red
}
#Cleanup Local Memory
Remove-Variable -Name ErrCode -Scope Local -Force
Remove-Variable -Name Result -Scope Local -Force
}
Function AppInstalled($Description) {
#Declare Local Memory
Set-Variable -Name AppName -Scope Local -Force
Set-Variable -Name Output -Scope Local -Force
#Change '%application%' to whatever app you are calling
$Description = [char]34+"description like"+[char]32+[char]39+[char]37+$Description+[char]37+[char]39+[char]34
$Output = wmic product where $Description get Description
$Output | ForEach-Object {
$_ = $_.Trim()
if(($_ -ne "Description")-and($_ -ne "")){
$AppName = $_
}
}
If ($AppName -eq $null) {
return $false
} else {
return $true
}
#Cleanup Local Memory
Remove-Variable -Name AppName -Scope Local -Force
Remove-Variable -Name Output -Scope Local -Force
}
Function ExecuteDCSU($App,$Switches) {
#Declare Local Memory
Set-Variable -Name ErrCode -Scope Local -Force
$App = [char]34+"C:\Program Files (x86)\Dell\ClientSystemUpdate\"+$App+[char]34
$Switches = "/policy"+[char]32+$RelativePath+$Switches
$ErrCode = (Start-Process -FilePath $App -ArgumentList $Switches -Wait -Passthru).ExitCode
If ($ErrCode -eq 0) {
Write-Host "Drivers Updated" -ForegroundColor Yellow
} else {
Write-Host "Failed with error"$ErrCode -ForegroundColor Red
}
#Cleanup Local Memory
Remove-Variable -Name ErrCode -Scope Local -Force
}
RenameWindow "Install Dell Client System Update"
GetRelativePath
GetOSArchitecture
BalloonTip "Dell Client System Update" "Updating Drivers...." 10000
InstallMSIApplication "Dell Client System Update.msi" "/qb- /norestart" $null "Dell Client System Update"
ExecuteDCSU "dcsu-cli.exe" "BuildPolicy.xml"
UninstallOldMSIApplication "Dell Client System Update"
BalloonTip "Dell Client System Update" "Driver Update Complete" 30000
#Cleanup Global Memory
Remove-Variable -Name OS -Scope Global -Force
Remove-Variable -Name RelativePath -Scope Global -Force

25/11/13

Clickjacking: Quá khứ, hiện tại và tương lai

Clickjacking là một loại hình tấn công liên quan trực tiếp với người dùng và không thể diễn ra nếu không có sự tham gia của người dùng. Theo nghĩa nào đó, Clickjacking một kỹ thuật nhằm đánh cắp các “cú click” của người dùng.
READ MORE »

16/11/13

Tối ưu hoá trình duyệt Firefox để duyệt web nhanh hơn

Firefox lúc hoạt động cũng như khi ở trạng thái minimize đều chiếm dung lượng bộ nhớ rất nhiều. Tuy nhiên nếu bạn biết một số tính năng ẩn của nó, sẽ cải thiện được đáng kể tốc độ của phần mềm này. Thủ thuật nhỏ và đơn giản dưới đây sẽ giúp bạn giải quyết vấn đề này,

READ MORE »

10/11/13

7 ứng dụng nên cài đặt sau khi cài đặt Ubuntu 13.04

1. Unity Tweak Tool - tinh chỉnh Unity
Unity Tweak Tool là một ứng dụng khá mới đó là có sẵn trong Ubuntu 13.04, đây là ứng dụng để tinh chỉnh hệ thống cho Ubuntu như : thay đổi các chức năng  khác nhau của giao diện Unity, tự động ẩn thanh Unity, thay đổi kích thước icon của thanh Launcher, thay đổi màu sắc, thiết lập HotCorners - trình quản lý cửa sổ , tinh chỉnh Dash, thay đổi GTK, giao diện các Icon hoặc phông chữ và nhiều hơn nữa...

https://blogger.googleusercontent.com/img/b/R29vZ2xl/AVvXsEgA_k8oMe6jv1Irvzrd2bYlKP_KLYVApaCphnpij1kGHY-cZbeASIgR9nkz7r544cl29ZVFWD7Klmvkso6X8wSsRxFV6cUiNuASTG7OIWbt5ajOJT_5i8Wuf-hmnEL8peE3uzFE1YrqDwU/s1600/need-app-13.04_001.jpg

Để cài đặt, chạy đoạn mã sau trên Terminal:


 sudo apt-get install unity-tweak-tool  

Nếu nhận lỗi "E: Unable to locate package unity-tweak-tool" thử lại với đoạn mã dưới:

 sudo add-apt-repository ppa:freyja-dev/unity-tweak-tool-daily & sudo apt-get update  
 sudo apt-get install unity-tweak-tool  

2. Zeitgeist - quản lý Dash nhanh
Zeitgeist - là một ứng dụng quản lý chức năng cho Dash. Thông thường thanh Dash của Ubuntu hiển thị rất nhiều thứ như: các file dùng gần đây, các ứng dụng, tên bài hát vừa nghe, bức ảnh vừa xem và các kết quả tìm kiếm online. Zeitgeist cho phép chúng ta tắt nhanh chức năng theo dõi của Dash, xóa bản nghi những file dùng gần đây và bật/tắt chức năng hiển thị kết quả tìm kiếm online.

<span style="color: #741b47;"><span style="color: black;">Zeitgeist - quản lý Dash</span><b><br></b></span>
Zeitgeist - quản lý Dash

Để cài đặt, chạy đoạn mã sau trên Terminal:
 sudo add-apt-repository ppa:diesch/testing  
 sudo apt-get update  
 sudo apt-get install indicator-privacy  

Khởi động lại hoặc Bấm Alt+F2 và chạy lệnh:

indicator-privacy

3. Thêm chức năng hiển thị thời tiết và lịch làm việc trên thanh Status Bar
Với một người của công việc, lịch làm việc và thời tiết là hai ứng dụng không thể thiếu. Bạn có thể cài đặt ứng dụng cho phép lên lịch hoặc xem dự báo thời tiết ngay trên thanh Status Bar cho Ubuntu 13.04 :)

<b>my-weather-indicator</b>
my-weather-indicator

Để cài đặt, chạy đoạn mã sau trên Terminal:
 sudo add-apt-repository ppa:atareao/atareao  
 sudo apt-get update
 sudo apt-get install my-weather-indicator
 sudo apt-get install calendar-indicator  

Vào Dash và chạy my-weather-indicatorcalendar-indicator. Nếu ưng ý và muốn khởi động cùng Ubuntu hãy vào "Option" -> "Auto Start"


<br>

4. TLP & BumBleBee- Cải thiện tuổi thọ pin và thời gian sử dụng   

Jupiter là ứng dụng giúp cải thiện tuổi thọ pin và thời gian sử dụng Ubuntu. Nhưng tiếc là ứng dụng này không hoạt động đúng trong Ubuntu 13.04 ( Trong 12.10 cũng hơi trục trặc ). Tuy nhiên, bạn vẫn có thể cài đặt TLP, một công cụ tự động chỉnh hệ thống của bạn sao cho việc sử dụng năng lượng tốt hơn / tuổi thọ pin cao hơn.
Để cài đặt, chạy đoạn mã sau trên Terminal:

 sudo add-apt-repository ppa:linrunner/tlp  
 sudo apt-get update  
 sudo apt-get install tlp tlp-rdw
 sudo tlp start  

Sau khi chạy đoạn mã trên TLP sẽ tự động tinh chỉnh hệ thống và giúp Ubuntu sử dụng năng lượng tốt hơn.

Và nếu bạn đang sở hữu 1 chiếc laptop chạy công nghệ Nvidia Optimus thì bạn nên cài đặt Bumblebee :


 sudo add-apt-repository ppa:bumblebee/stable  
 sudo apt-get update  
 sudo apt-get install bumblebee bumblebee-nvidia  

5. Sửa lỗi Google Chrome, Skype
Đối với những người nâng cấp từ phiên bản 12.10 lên 13.04 và đã cài đặt Google Chrome trước đó như tôi dường như không gặp phải lỗi này. Tuy nhiên với người cài đặt mới phiên bản 13.04, thì Google Chrome gặp lỗi không thể cài đặt được. Tuy nhiên bạn vẫn có thể cài đặt Google Chrome sau khi cài đặt ứng dụng đã đóng gói dưới đây:
Việc Skype xung đột và bị Crash đối với người dùng máy tính sử dụng card đồ họa Nvidia và một số card đồ họa khác được khắc phục bằng cách chạy dòng lệnh sau:

 sudo sed -i 's/^Exec=skype.*/Exec=bash -c "export LD_PRELOAD=\/usr\/lib\/i386-linux-gnu\/mesa\/libGL\.so\.1 \&\& skype %U"/' /usr/share/applications/skype.desktop  


Nếu muốn quay lại cài đặt trước khi chạy dòng lệnh trên thì chạy dòng lệnh dưới:

 sudo sed -i 's/^Exec=bash.*/Exec=skype %U/' /usr/share/applications/skype.desktop  

6. Y PPA Manager - Di chuyển / nâng cấp PPA (người dùng cao cấp)

Nếu bạn đã nâng cấp từ Ubuntu 12.10 lên Ubuntu 13.04, tất cả các PPA của bạn đã bị vô hiệu hóa trong quá trình nâng cấp.  Y PPA Manager - là ứng dụng có thể giúp bạn khôi phục PPA cũ và quản lý PPA rất mạnh mẽ. Để cài đặt chạy lệnh sau trong Terminal:

 sudo add-apt-repository ppa:webupd8team/y-ppa-manager  
 sudo apt-get update  
 sudo apt-get install y-ppa-manager  

Y ppa manager - quản lý PPA
7. Cài đặt các codec, Java

Một vài gói tin hỗ trợ âm thanh cho Ubuntu không được tích hợp sẵn trong phiên bản 13.04 vì lí do bản quyền. Để chạy được một số định dạng âm thanh và video bạn chỉ cần cài đặt nó. Tương tự, Java không tích hợp sẵn trong hầu hết mọi phiên bản Ubuntu. Vì vậy để cài đặt codec và java chi cần chạy dòng lệnh dưới 
 sudo apt-get install ubuntu-restricted-extras  
 sudo apt-get install libavformat-extra-53 libavcodec-extra-53  
 sudo apt-get install icedtea-7-plugin openjdk-7-jre  
 sudo apt-get install openjdk-7-jdk  

KẾT
Trên đây là bài giới thiệu các phần mềm bạn nên cài sau khi cài đặt Ubuntu 13.04, hi vọng sẽ giúp ích đc cho nhiều bạn :D

Cài đặt Mac OS X cho Ubuntu (Mint)

Giao diện Mackintosh nhìn chung là rất đẹp, nhiều người muốn sử dụng Mac OS X cũng chỉ vì nó quá đẹp. Bản thân tôi rất thích sử dụng giao diện của Mac bởi vì nó chau chuốt, được đầu tư về mặt thẩm mĩ. Kết hợp giữa giao diện Mac Os X và Ubuntu làm tăng " hứng thú " trong công việc hơn :))


Điều may mắn là có nhiều cách để tay đổi giao diện "Mac OS X" cho Ubuntu.


1. Wallpaper:


Nếu bạn muốn có hình nền phong cách Apple, bạn có thể tải 16 hình nền chọn lọc theo chủ đề ở bên dưới hoặc là bạn có thể nhờ Google tìm hộ


https://blogger.googleusercontent.com/img/b/R29vZ2xl/AVvXsEhSfx3ds4Uz1i4Iin0EyRRLuXJ1u9Zdwi7SZYJhwF6aAghf8JNh_v3VY6HRMZU3b4UCePoxG4FkHomULgZgF83nXmyKd1WZFXQUXC6PX5rDSndHh55rrXlr3NzqyQ73UcEud4I33Qq9kQs/s400/macosx-ubuntu_001.jpg


Download Mac-OS X Wallpaper for Ubuntu


2. Themes

Chạy lệnh dưới để cài giao diện Mac-OsX Lion cho Ubuntu (Giao diện do noobslab.com phát triển)

Open Terminal$run code:~$

sudo add-apt-repository ppa:noobslab/themes
sudo apt-get update
sudo apt-get install mac-icons-noobslab
sudo apt-get install mac-ithemes-noobslab

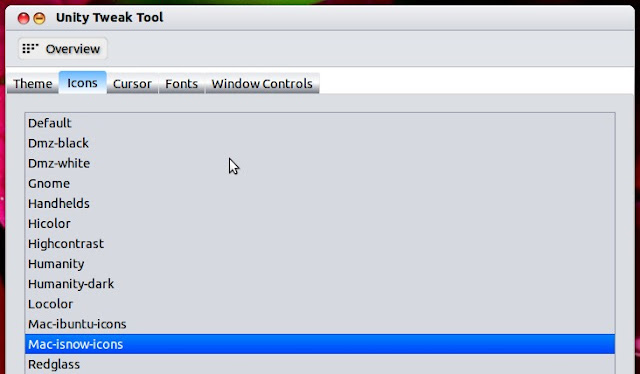
Sau đó sử dụng Unity Tweak : "Appearance &gt;&gt; Themes" sẽ có danh sách 5 giao diện Mac gồm: Mac-ibuntu, Mac-Ilinux, Mac-Lionbuntu, Mac-Xbuntum, Mac-os-lion. Chuyển sang tab "Icons" bạn có thể chọn 2 gói Icon Mac.


https://blogger.googleusercontent.com/img/b/R29vZ2xl/AVvXsEgQHVQpN7iJcGFbs3W8BXbFWuvDjZsuxdBu_kfqpHLdjmj3xoh6VwKChw3bUeGtIuNjAIcLRYlW4vHY1S5lVpEXPDMzCF0MxX7KMV16D_0-a3KK-uhj6Dvkhg4id-n-B_JAMgFSY1Of5ac/s640/macosx-ubuntu_004.jpg


https://blogger.googleusercontent.com/img/b/R29vZ2xl/AVvXsEjLQugRBHWgQRWnKZ7VJu_qVfvyQEknCOdSr2OZfj98vV5W_WxAV37sIwDzPSqWM63EicjvPdIZgV3y-Ako7E08kgNOUjpYqGtb6zKqsbF4PZdeAJGVIfPbpUe_WONLt0OX1N5OEQ8FiDM/s640/macosx-ubuntu_003.jpg


3. Dock Bar

Nếu bạn muốn có Dock Bar giống của Mac OSX, tôi khuyên bạn nên sử dụng ứng dụng Cairo-Dock - ứng dụng này nhiều chức năng, dễ sử dụng và rất đẹp.


Open Terminal$run code:~$
 sudo add-apt-repository ppa:cairo-dock-team/ppa
sudo apt-get update
sudo apt-get install cairo-dock cairo-dock-plug-ins

Mở Dash và chạy ứng dụng Cairo-Dock. Phiên bản Cairo-Dock with Open-Gl sẽ có những hiệu ứng đẹp.


Bạn có thể sử dụng đồng thời Cairo-Dock và Unity. Nếu bạn chỉ muốn sử dụng Cairo-Dock, hãy chọn chế độ "Auto-hide" cho Unity trong ứng dụng Unity Tweak.


https://blogger.googleusercontent.com/img/b/R29vZ2xl/AVvXsEg5ExKMIIk6-2H5AqnJf7pAI5pyQFsJ7CxmF6LGRnhvKhz5FZ47wlTc2n1FeY6qBFGis_C92mWo1eRgiVHxt8Y5UAMRAT951iBhd6KQfNZAUMJMu5uU9cpw-32PvvqbDwu4aBFGcyUKm2c/s640/macosx-ubuntu_007.jpg


Bật chức năng "Auto-hide" cho Unity

Cairo-Dock hỗ trợ một thư viện rộng lớn về Themes và rất nhiều Addon (Thời tiết, Đồng hồ, Folder View...). Hình ảnh bên dưới sẽ hướng dẫn cách dùng cơ bản cho Cairo-Dock :

https://blogger.googleusercontent.com/img/b/R29vZ2xl/AVvXsEjZxQcVsVpwwnsa30OHLxoMp19HPv6wNnHLv7wKR7BgpSH-4MZQmuGQY4mG1d6_Gf91XrfmQPV2PB1dSVIEVPBYZCXKGflacPIfFbiFB3hvJAyhRwJXZGwvxo7gwA16p-MRmV6j8K4Mg7I/s640/macosx-ubuntu_008.jpg


Cairo-Dock mang phong cách Mac Bar cho Ubuntu


4. Con trỏ

Cài đặt giao diện con trỏ giống trên Mac, bạn mở Terminal và chạy các dòng lệnh bên dưới :


Open Terminal$run code:~$
 wget -O mac-cursors.zip http://goo.gl/xh52J sudo unzip mac-cursors.zip -d /usr/share/icons/ &amp;&amp;
 rm mac-cursors.zip cd /usr/share/icons/mac-cursors
 sudo chmod +x install-mac-cursors.sh uninstall-mac-cursors.sh ./install-mac-cursors.sh

Để xóa giao diện con trỏ Mac:


Open Terminal$run code:~$ cd /usr/share/icons/mac-cursors sudo ./uninstall-mac-cursors.sh

5. Trình duyệt


Nếu bạn muốn có trình duyệt web trông giống Safari của Apple, bạn có thể cài đặt Safari for Window thông qua Wine. Hoặc bạn có thể thay đổi giao diện của trình duyệt Firefox, Chrome, Opera mà bạn đang sử dụng.


* Download giao diện Mac for Firefox
* Download giao diện Mac for Chrome

* Download giao diện Mac for Opera


https://blogger.googleusercontent.com/img/b/R29vZ2xl/AVvXsEgxhd8NEI6zj1Oov0VIMkqkxxwLtzhXq1d32Ixy_AcAWf5CnLEfm_uQpUlPnqUdEdZAm4xTK4utw5kk6fvwNOVoowrJ1WlLRFXvqbtjACysZ5WAWN7Fv5pZqxAqW4Ia8oUpu-oo0y9vuWI/s640/macosx-ubuntu_009.jpg